
Mastering HubSpot DKIM: Your Guide to Secure Email Authentication


Facing email deliverability issues?
Learn how to set up DKIM in HubSpot to confirm the authenticity of your emails, enhance deliverability, and protect against spoofing with DKIM authentication.
This step-by-step guide simplifies HubSpot DKIM implementation and troubleshooting, helping you maintain a trustworthy email presence.
DKIM (DomainKeys Identified Mail) is an email authentication protocol and email security standard that helps detect whether messages are altered in transit between sending and receiving mail servers.
It uses public-key cryptography to sign email with a responsible party’s private key as it leaves a sending server. Recipient servers then use a public key published to the DKIM’s domain to verify the source of the message and ensure that the parts of the message included in the DKIM signature haven’t changed since the message was signed.
Once the signature is verified with the public key by the recipient server, the message passes DKIM and is considered authentic.
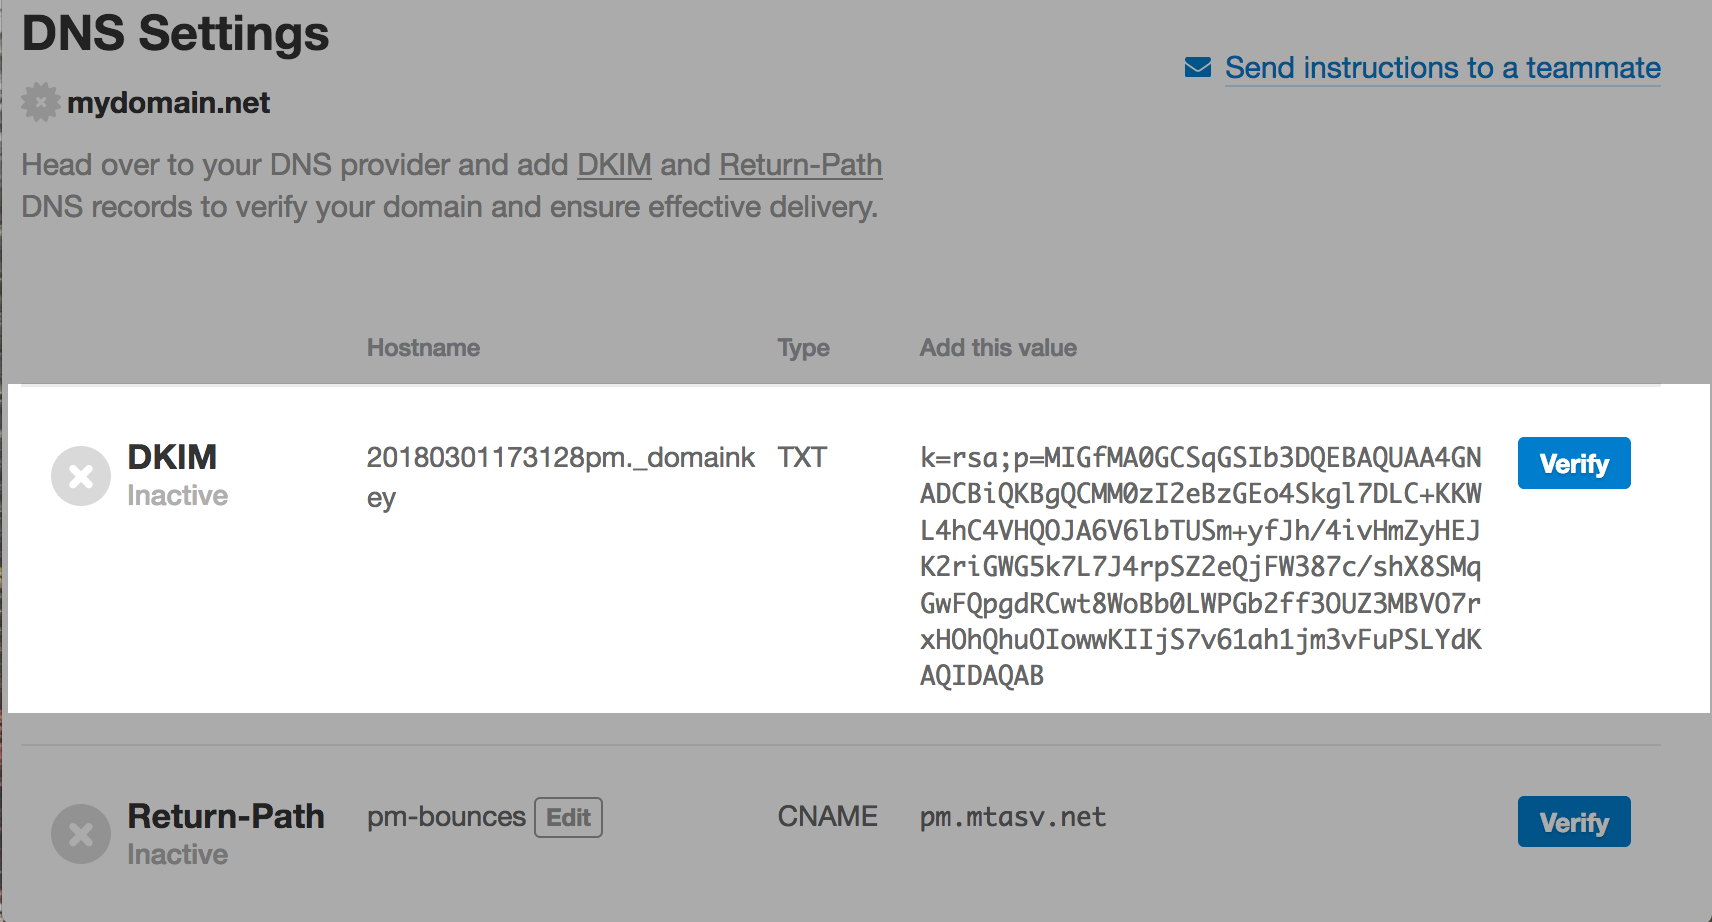
A DKIM record is a specially formatted DNS TXT record that stores the public key the receiving mail server will use to verify a message’s signature.
A DKIM record is formed by a name, version, key type, and the public key itself. It is often provided by the email service provider that sends your email.
Learn more about the concept of DKIM record by watching this video :
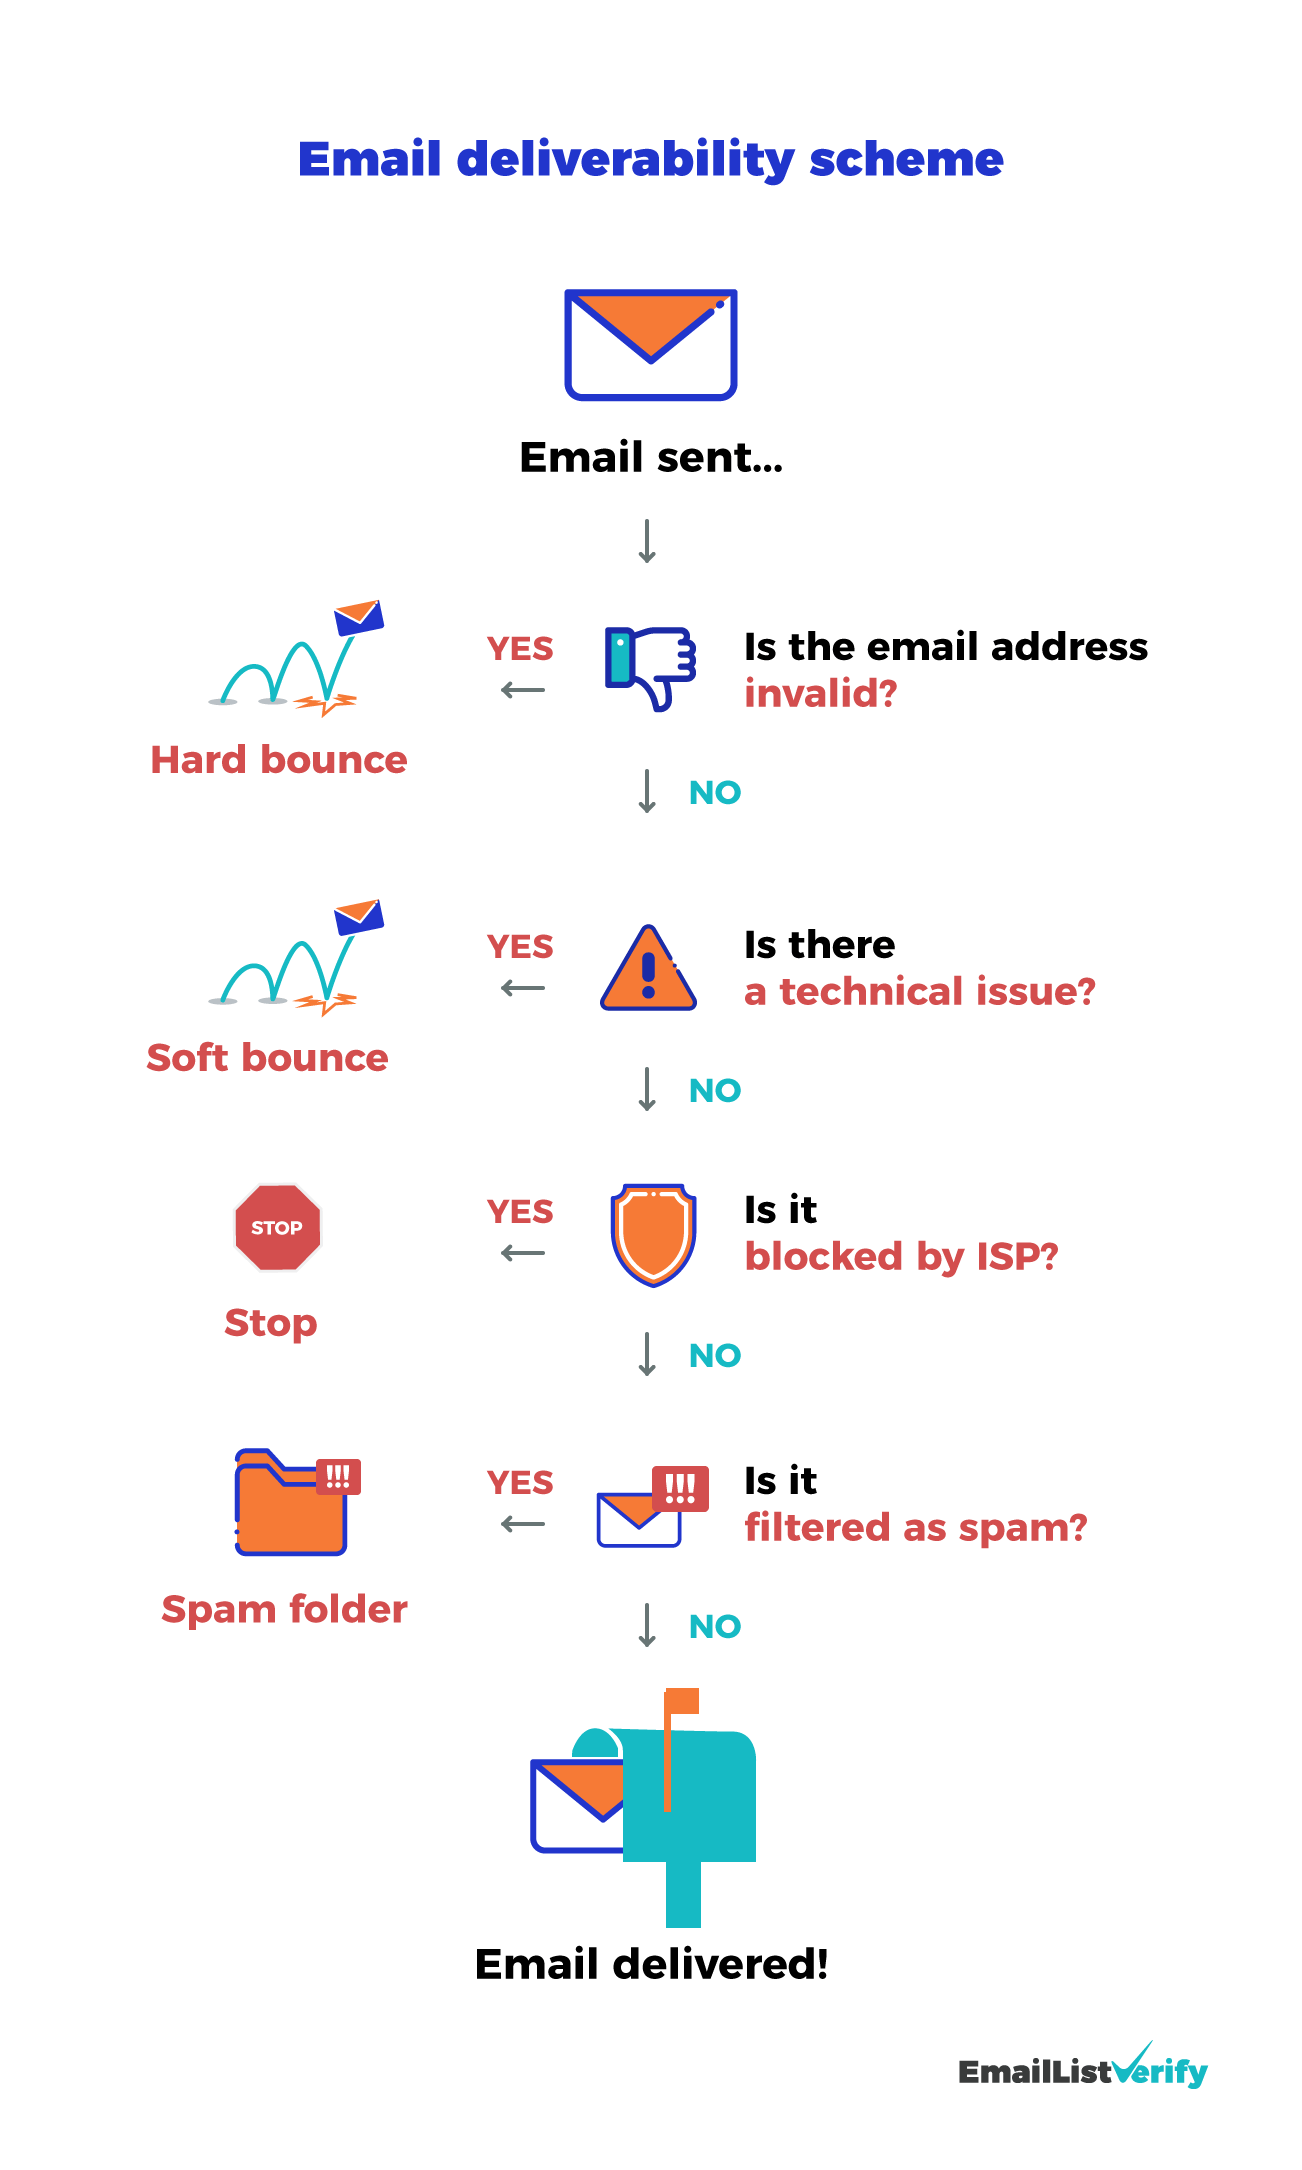
While DKIM isn’t required, emails signed with DKIM appear more legitimate to recipients and are less likely to end up in junk or spam folders.
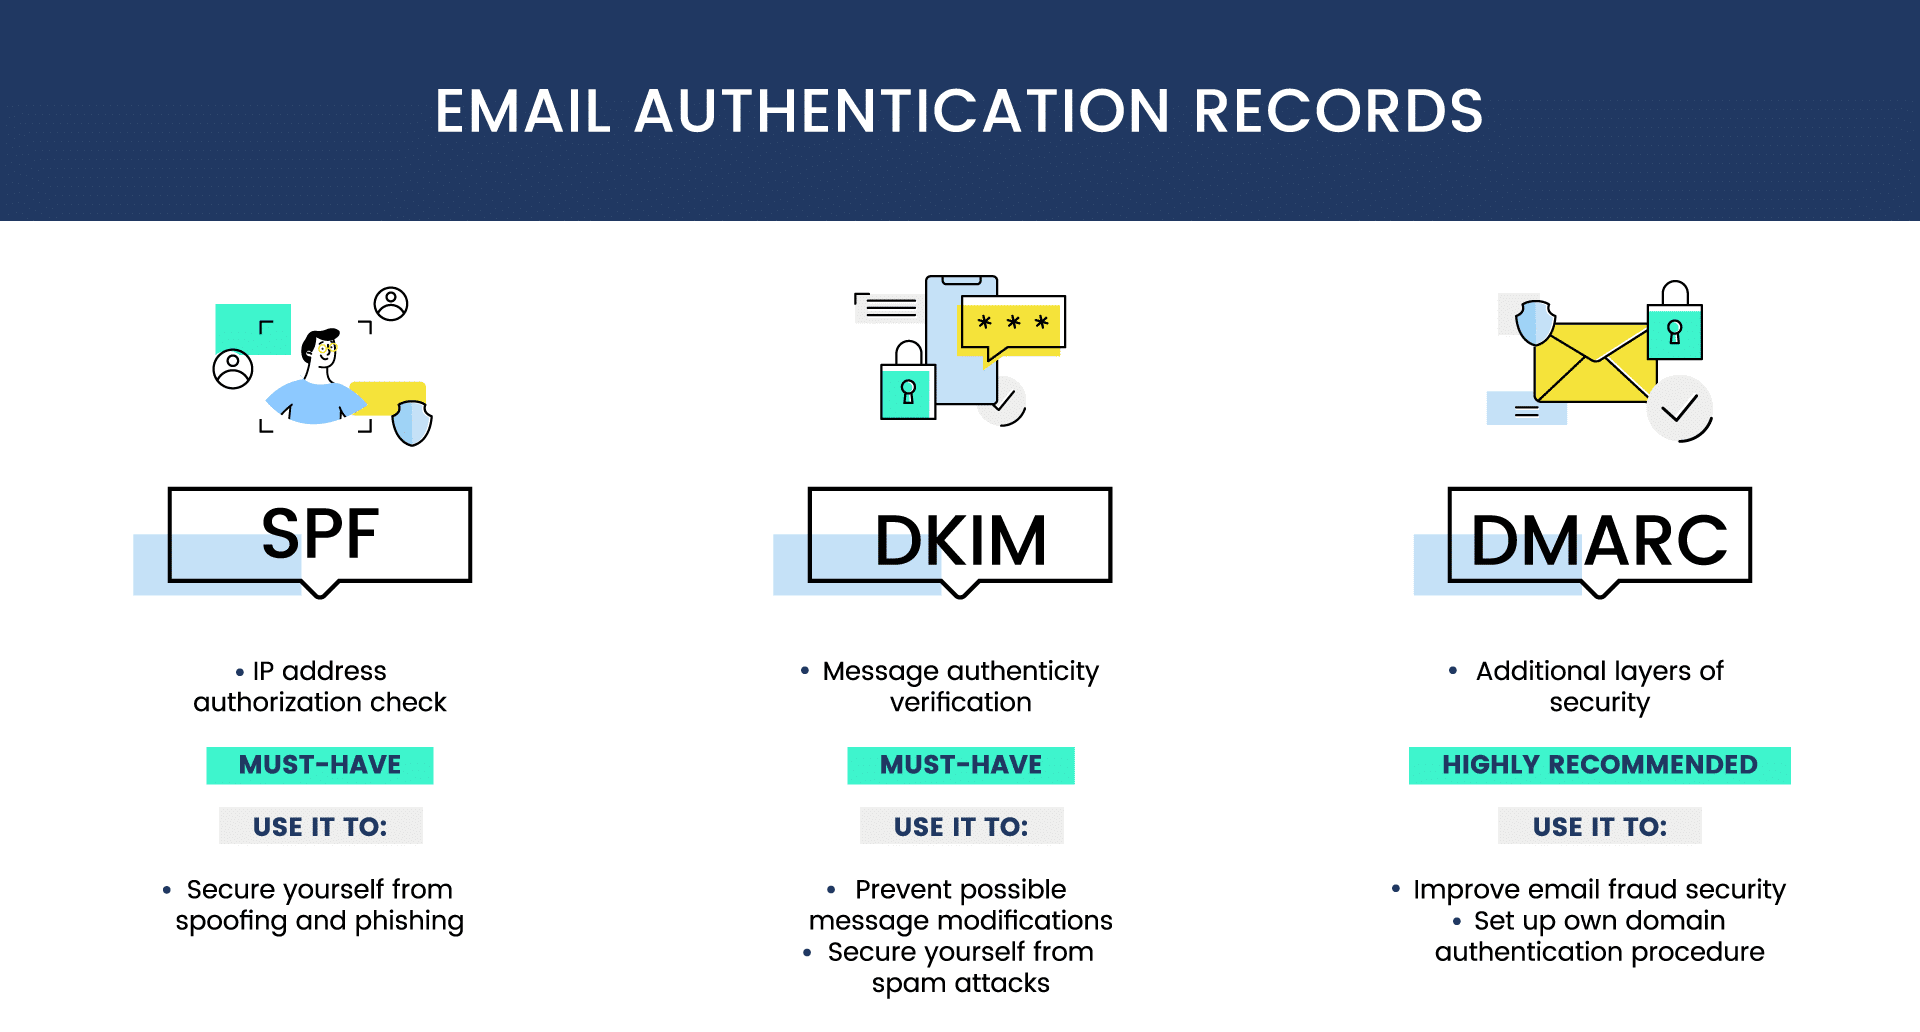
DKIM works with SPF (Sender Policy Framework) and DMARC (Domain-based Message Authentication, Reporting, and Conformance) to create multiple layers of security for domains sending emails. When setting up DKIM, it is crucial to select the primary domain for email authentication purposes.

ISPs (Internet Service Providers) use DKIM to build a domain reputation over time. As you send email and improve your delivery practices (low spam and bounces, high engagement), your domain builds a good sending reputation with ISPs, which improves email deliverability.
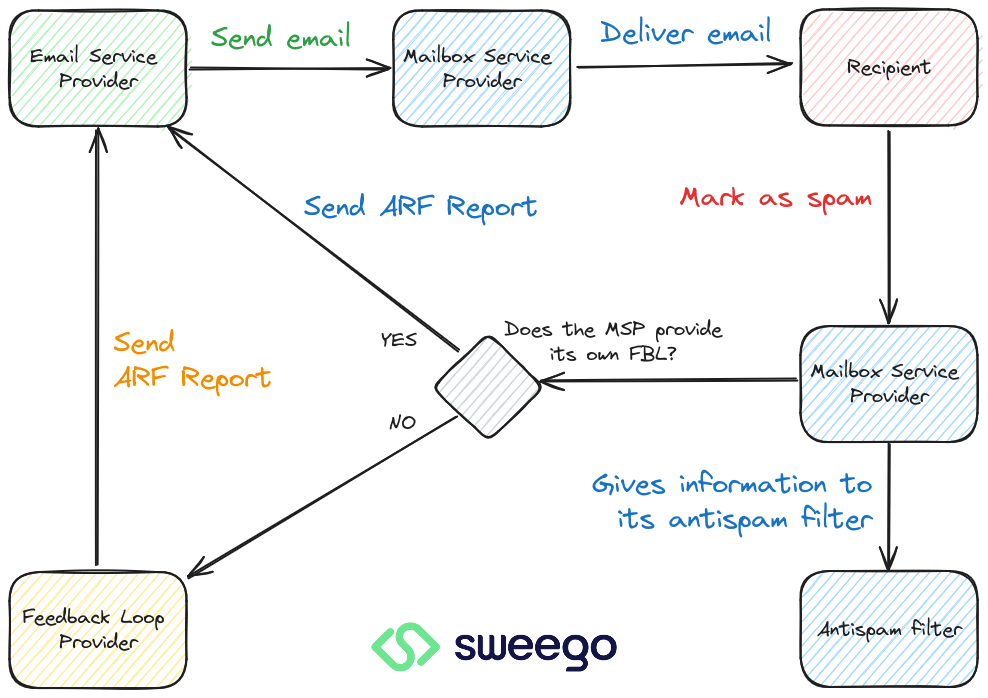
Email spoofing is a technique used by cybercriminals to fake the source of an email, making recipients believe it’s from a trusted sender when it’s not.
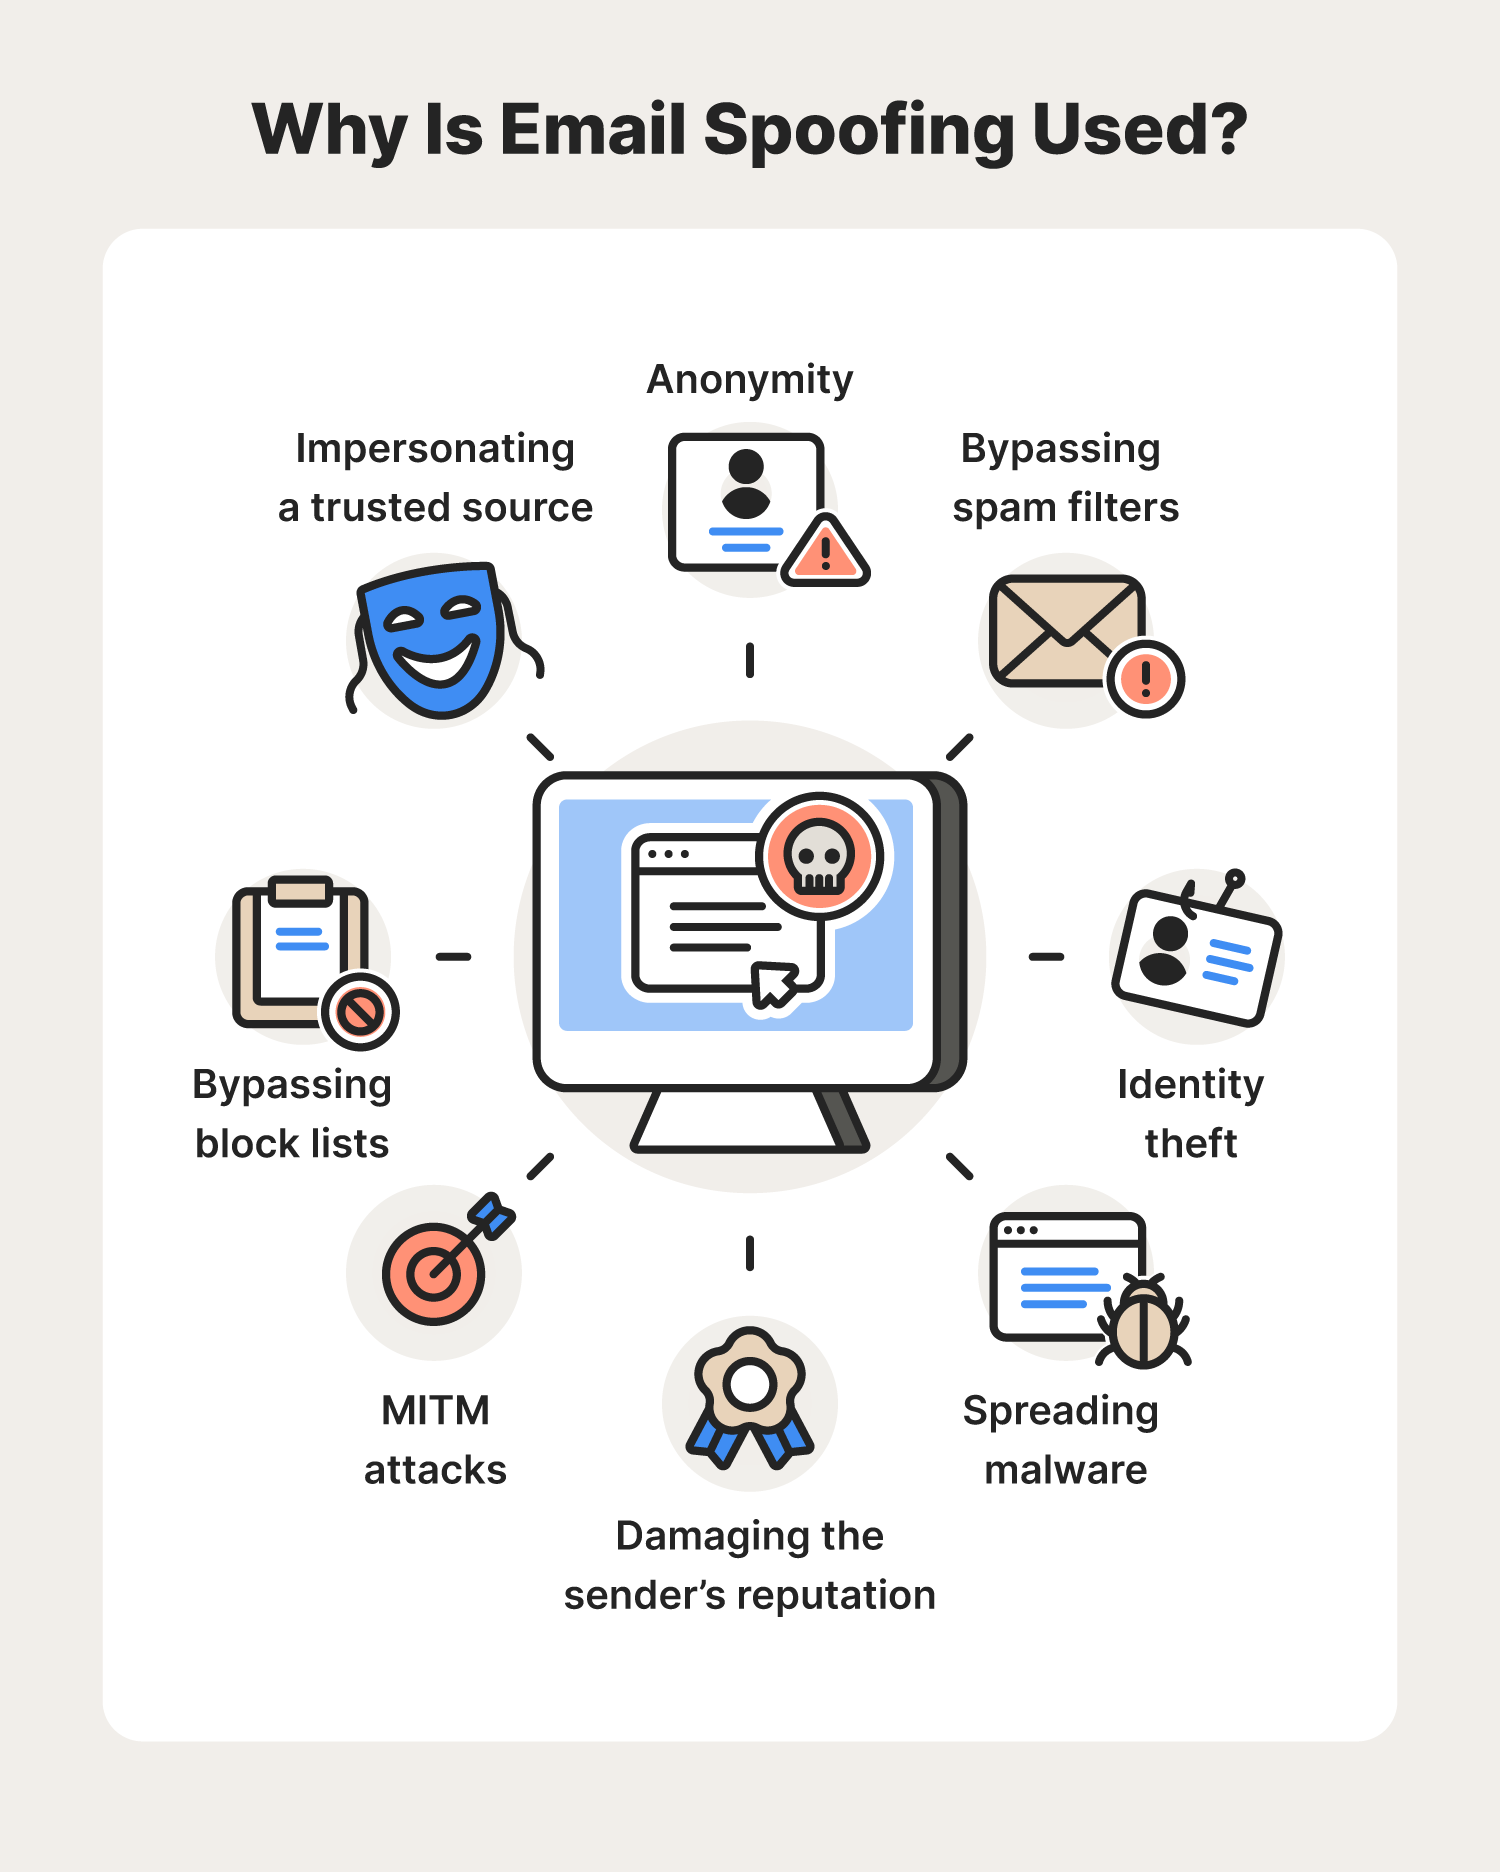
DKIM prevents these attempts by adding an encrypted header to each email, allowing receivers to verify the email’s origin and confirm it hasn’t been tampered with.
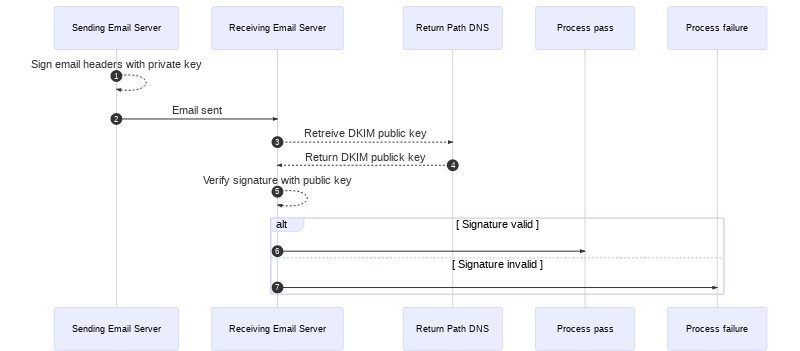
However, DKIM needs the support of two more key players in email security: DMARC and SPF.
Here’s how they work together:

Together, these three protocols form a strong defense against email spoofing.
With evolving standards, email authentication is becoming a requirement. Giants like Google and Yahoo have announced that starting in February 2024, email authentication will be mandatory for all bulk email senders. Emails without proper DKIM configurations might face deliverability issues.
Setting up DKIM is like getting a VIP pass to the inbox. By implementing DKIM, you build trust with email service providers, showing that you are a credible and authentic sender. This trust results in better email deliverability, ensuring your marketing emails reach their intended targets and comply with upcoming email provider standards.
Setting up DKIM in your HubSpot account might seem challenging, but it's straightforward.
Follow these three steps: access the domain connection screen, connect your email sending domain, and configure DNS records to authenticate your emails.
To start, you’ll need to find your way to the gateway of the process—the domain connection screen. Begin by:
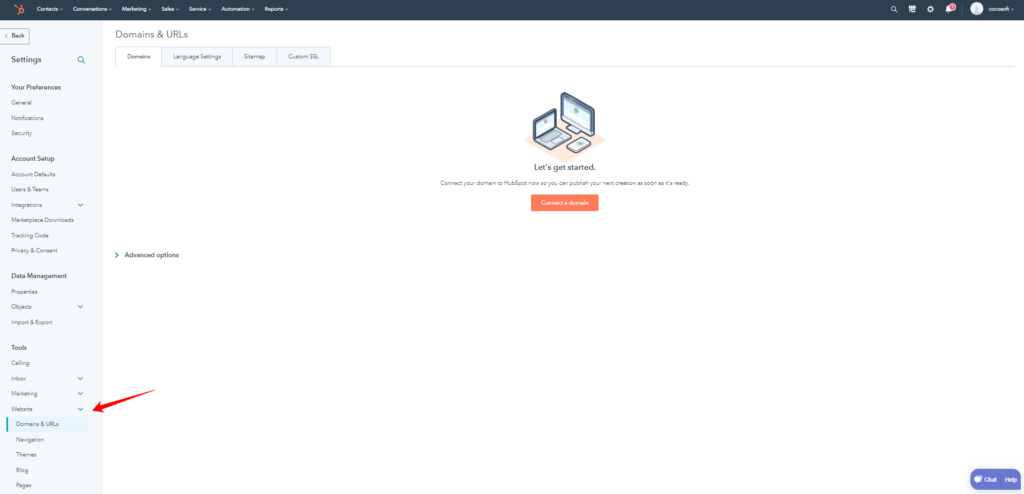

By clicking 'Connect a domain,' you'll begin securing your emails, enhancing your credibility, and protecting your brand against email spoofing.
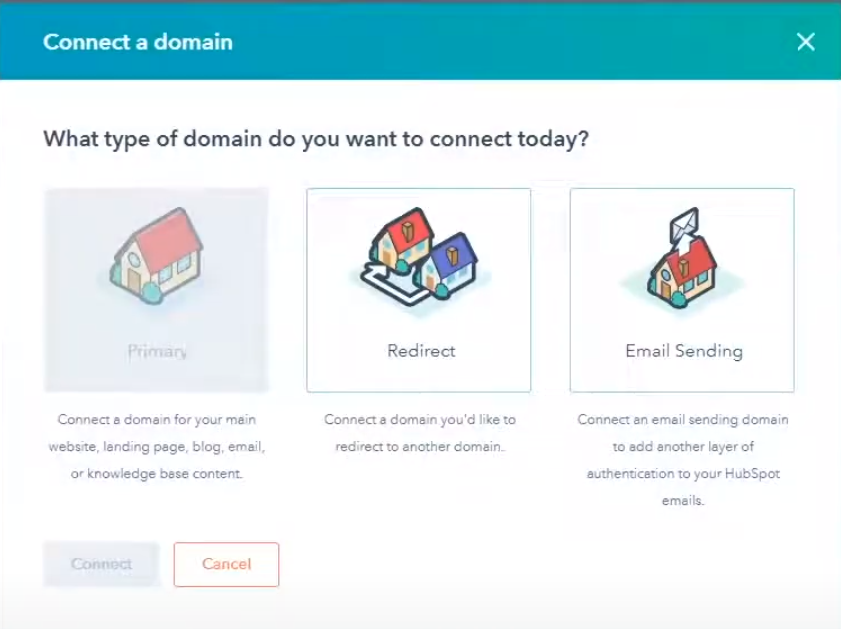
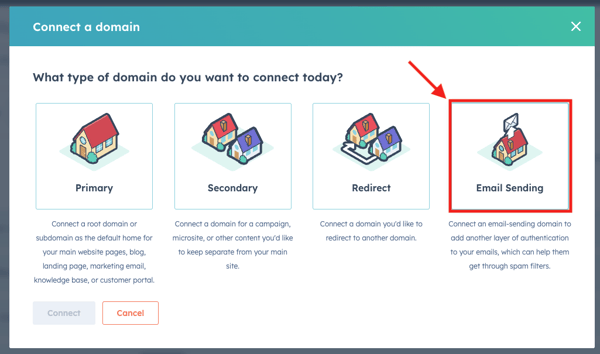
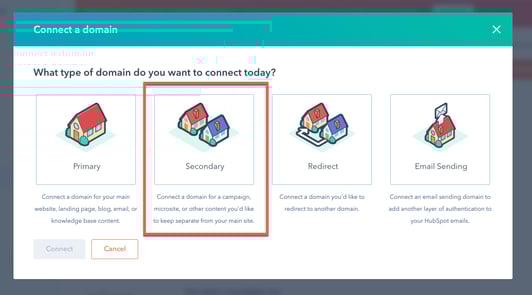
Now, cast your eyes upon the domain connection screen, where you’ll select ‘Email Sending’ as your domain type—a choice that signifies your commitment to securing your email communication.
You can connect a subdomain to a CMS and access email sending domain settings without fully connecting the brand domain.
Follow these steps:
HubSpot guides you through this crucial step, ensuring your domain is fortified with SPF and DMARC records, the stalwart companions of DKIM.
For a more visual tutorial watch this video, that will guide you through the entire implementation process :
With your domain connected, the next step in setting up DKIM is configuring the DNS settings.
Here’s how to set up your DKIM records:
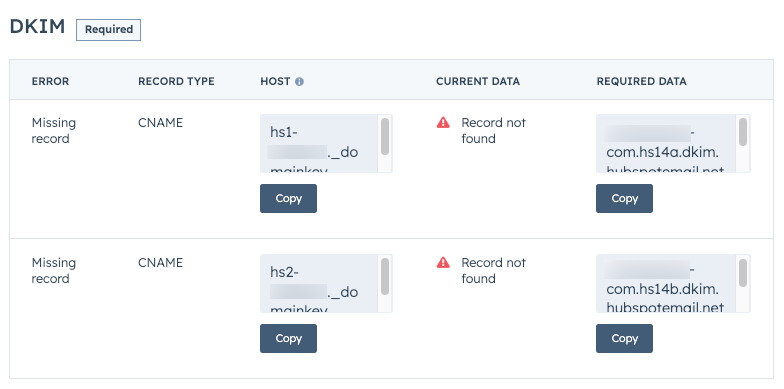
For more detailed instructions on adding DNS records, you can consult HubSpot’s DNS setup guide, which offers step-by-step guidance for popular DNS providers like GoDaddy.
Once you have configured your DNS records, you need to verify the setup in HubSpot:
DNS records can take several hours to be fully verified. HubSpot will update the status of your DKIM setup within your domain settings, ensuring everything is correctly configured. Be patient, as DNS propagation might take up to 48 hours.
Tip : Use tools like MXToolBox for DKIM lookup.
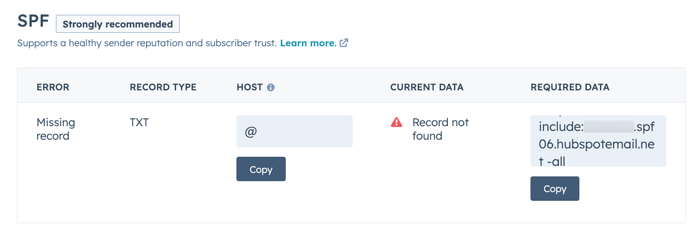
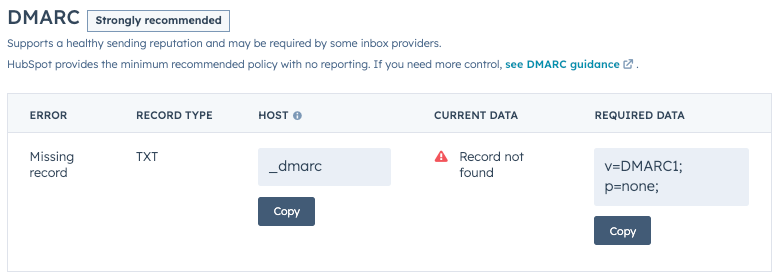
In addition to DKIM, setting up SPF and DMARC records is essential for comprehensive email authentication.
Here's how to do it:
Configure your SPF record:
Configure your DMARC record:
Even well-configured setups can run into issues. Common problems might include errors in DKIM selector records or issues with the DKIM signing server.
Here are some steps to troubleshoot:
Tip: A common cause for DKIM verification errors is a missing or misconfigured private or public key. In order for DKIM to work correctly, both of these keys must be present. In some cases, simply regenerating the public and private key pair can resolve the issue and save time troubleshooting.
Watch this video to discover more DKIM failures examples :
Even meticulous setups can encounter issues, such as a Record Invalid Error. To troubleshoot, follow these steps:
Setting up DKIM, SPF, and DMARC provides a solid foundation for email authentication.
However, to truly master HubSpot email practices, you need to focus on strategic optimization. This involves building an engaged email list, crafting compelling content, and analyzing key metrics to refine your strategy.
To ensure your emails reach the inbox and drive engagement, follow these key strategies:


.png)
Choosing the right email sending domain is crucial for maintaining your brand’s reputation and ensuring effective communication.
Here are some tips:
Strategically selecting and managing your email sending domains helps craft a professional and trustworthy image that resonates with every subscriber.
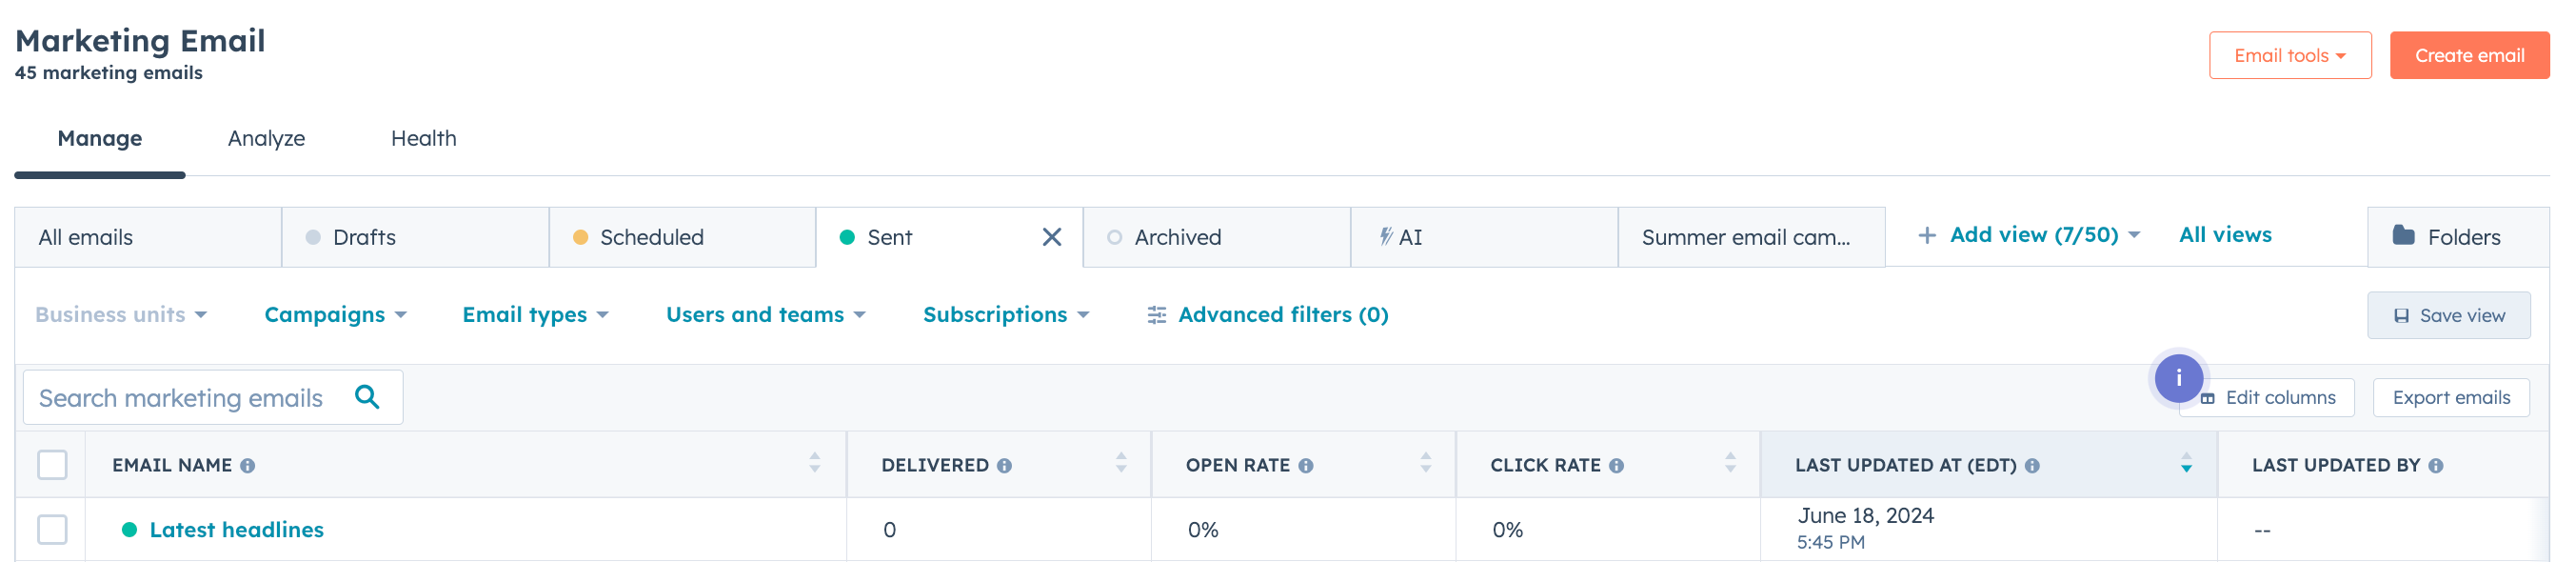
After implementing DKIM, monitoring and optimizing email performance is crucial. Here’s how to ensure your emails are effective:
By consistently monitoring and adjusting your email strategy based on these insights, you can maintain a strong and trusted email authentication system.
To resolve a DKIM Record Invalid Error, review and correct your DNS settings, disable specific settings like CNAME flattening and proxy, and use HubSpot's domain setup interface to verify the setup.
DKIM is an email authentication method that prevents email spoofing by verifying that emails are genuinely from your HubSpot account and have not been altered.
DKIM is an email authentication method that uses a digital signature to protect outgoing messages. This signature allows receiving mail servers to verify that the message truly comes from the stated sender and hasn't been altered by anyone impersonating the sender.
SPF and DKIM authenticate emails, while DMARC adds alignment. When an email passes SPF or DKIM and matches the domain in the "From" header, it satisfies DMARC requirements.
DKIM records can take up to 48 hours to propagate after changes are made in your DNS settings.


