How to use the HubSpot prospecting agent: The ultimate guide for sales teams
HubSpot's Prospecting Agent can research prospects, write emails, and send follow-ups automatically. Learn how to set it up, enroll contacts, and configure it for results in under 30 minutes.
I’ve yet to meet a rep who loves prospecting.
And I don’t just mean enrolling a list of contacts into a sequence and washing your hands of the whole thing. That’s the easy part.
I mean finding, qualifying, and segmenting contacts and the grueling process of reaching out to them across channels until you get an enthusiastic “yes” or a door slammed in your face.
HubSpot’s prospecting agent can solve that for you, at least a little bit. While HubSpot’s prospecting agent can’t fully replace you, it is effective at offloading busywork from your plate and helping you prospect efficiently. In this guide, I’ll share how to set up the HubSpot prospecting agent, what to watch out for, and demonstrate how to use it effectively.
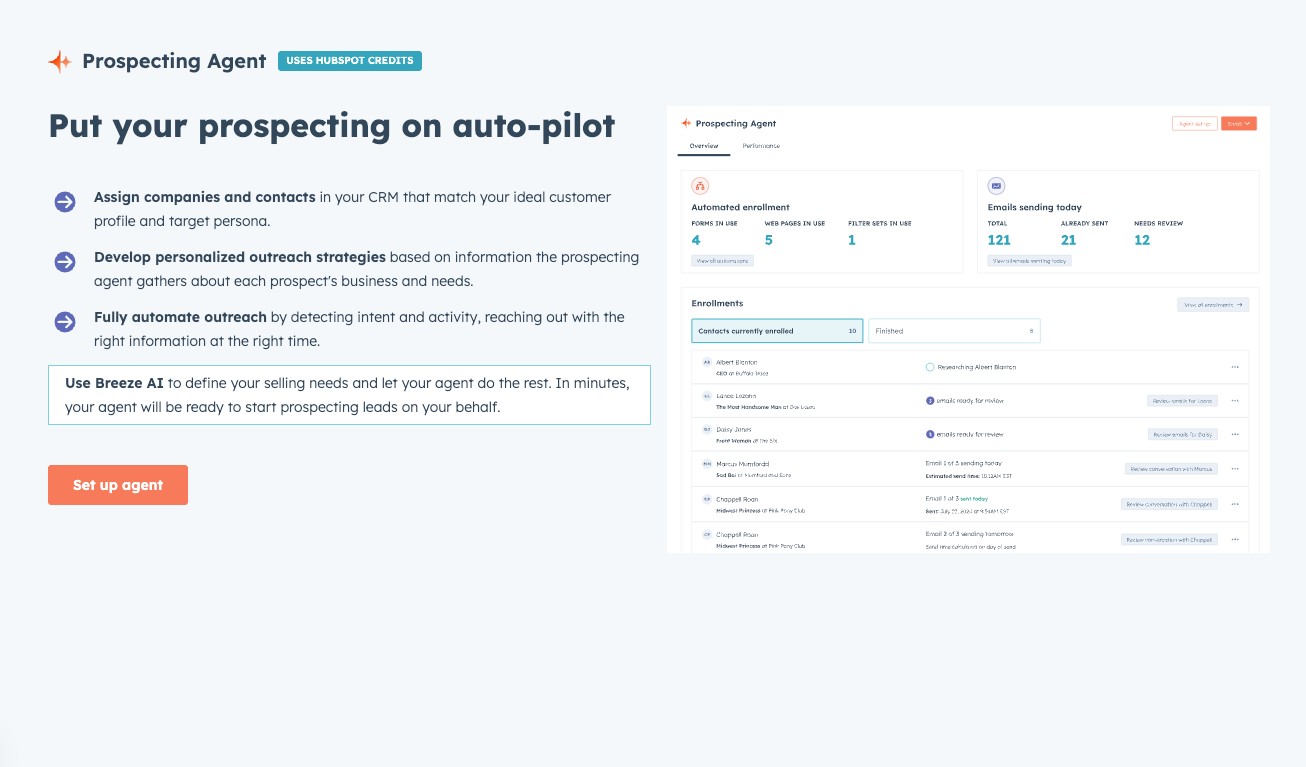
What is the HubSpot prospecting agent?
Imagine if you had an AI-powered teammate who could help you research prospects, draft emails, and send messages at the right time, every time.
That, in a nutshell, is HubSpot’s prospecting agent.
The HubSpot prospecting agent is an AI-powered sales automation tool built into HubSpot's CRM that can help you with research, drafting messages, and sending messages to prospects. It’s part of the Breeze AI suite, HubSpot’s collection of AI-powered marketing and sales tools that automate tasks and generate content.
The prospecting agent is available to Sales Hub Professional and Enterprise users, and can run semi-autonomously or fully autonomously, depending on how much oversight your team wants.
Specifically, you can use the prospecting agent to…
- Gather company and contact information from HubSpot CRM data, public sources like LinkedIn profiles, company websites, news articles, and funding announcements to build a comprehensive picture of each prospect.
- Create custom outreach messages based on prospect data, your selling profile, and the specific pain points and value propositions you define.
- Schedule and send follow-up emails automatically based on engagement patterns, maintaining momentum without requiring manual intervention from your sales reps.
- Identify when prospects respond and adjust the outreach sequence accordingly, stopping automated follow-ups and flagging the conversation for a rep to take over.
While the prospecting agent can’t make and receive calls for you (yet), it can take a load off your daily workflow, allowing you to focus on higher-value tasks.
How to set the HubSpot prospecting agent up
Prospecting agent is easy to set up, but take care to follow the instructions so that A) the output is good and B) the tool doesn’t go rogue with your CRM. You should be able to set things up in under 30 minutes. Just follow the steps below:
- Run through the prospecting agent setup
- Enable AI data sources
- Connect your email sending account
- Set up your exclusion lists
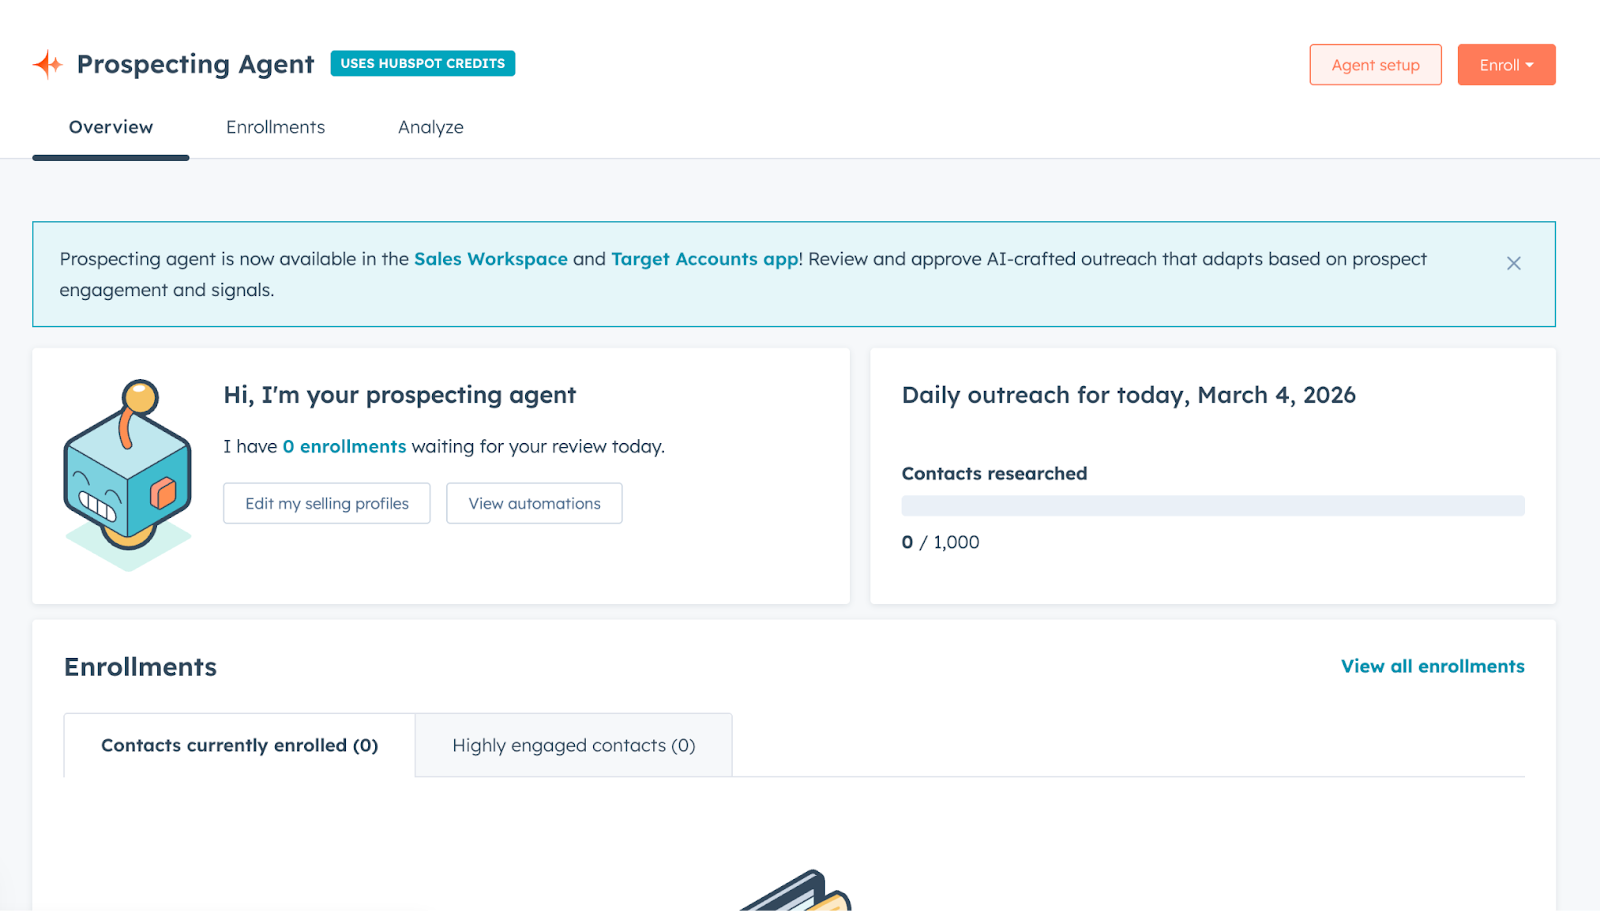
1. Run through the prospecting agent setup
In your HubSpot account, click Sales in the side menu, then select Prospecting Agent.

Once you're on the prospecting agent page, click the "Set up agent" button in the top right corner to begin the configuration wizard.
You’ll be prompted to set up a selling profile, enter your website for analysis, and select the industries you sell to and the personas you target.
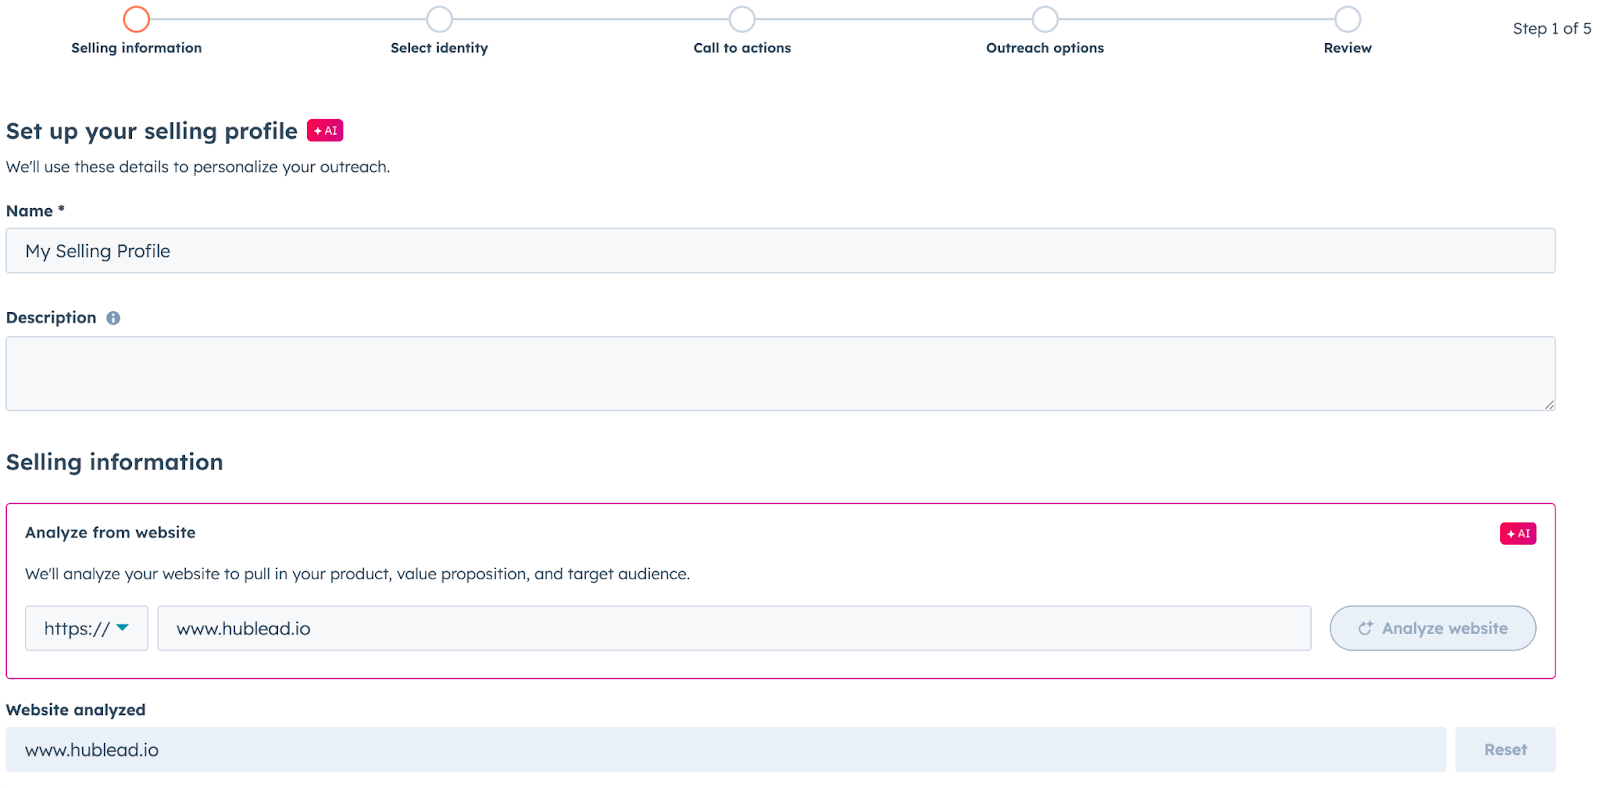
Breeze will automatically summarize information about your products and services based on your website. Review and edit this information for this selling profile as needed.
Then, you’ll need to select who the prospecting agent will be emailing on behalf of. You can either send from the contact owner or from a specific user in your portal.
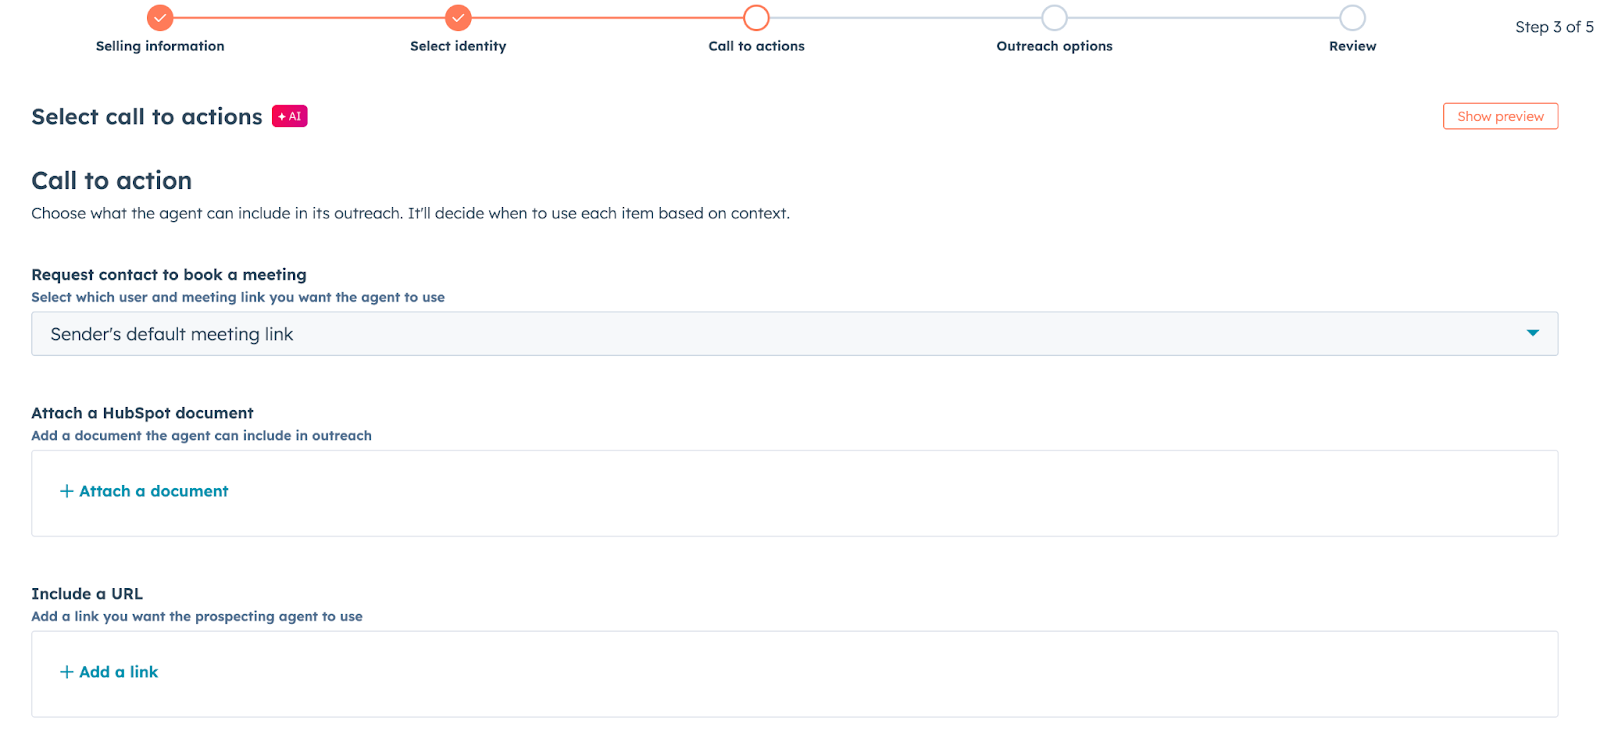
Next, you can configure the calls to action the prospect agent uses and any documents or attachments it sends in an email.
And finally, you can review and approve messages before they are sent (recommended at the start) or send them automatically. You can also configure the tone that is used and your brand voice.
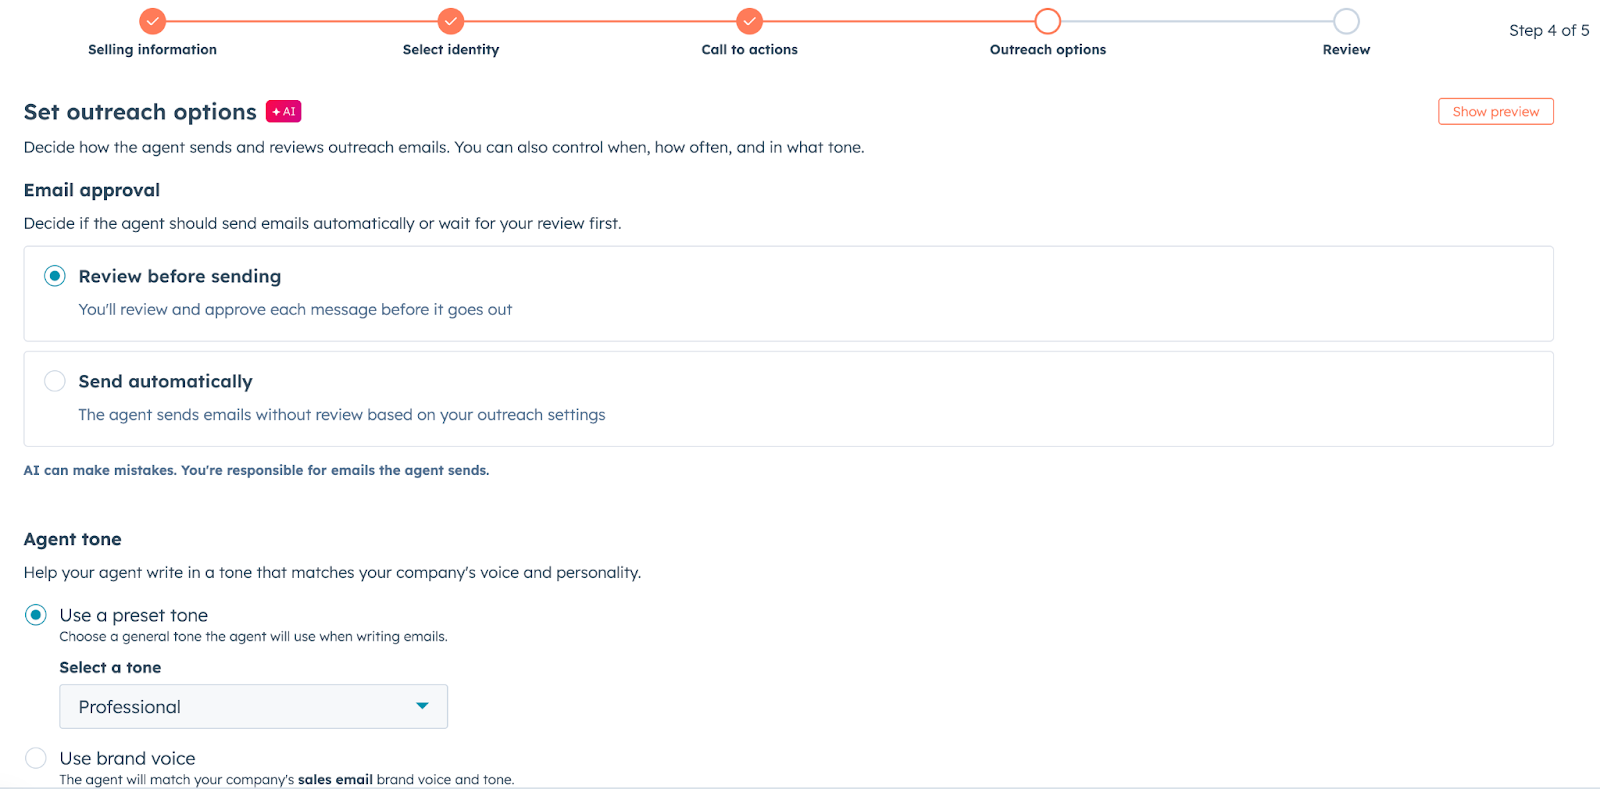
Don’t skip this part, you want these messages to sound like you! And if you click on Show additional options at the bottom of the page, you’ll see two more settings to configure:
- Outreach frequency: You can set the minimum number of days between emails and the maximum number of emails per enrollment. I’d start with the default options and tweak them as you go based on performance.
- Email send window: You can set the prospecting agent to email only during business hours to improve your chances of being seen and minimize the risk of being marked as spam.
Once these are set, your prospecting agent is almost ready to go live! Just work through the remaining steps to make sure it can access everything it needs to in your portal.
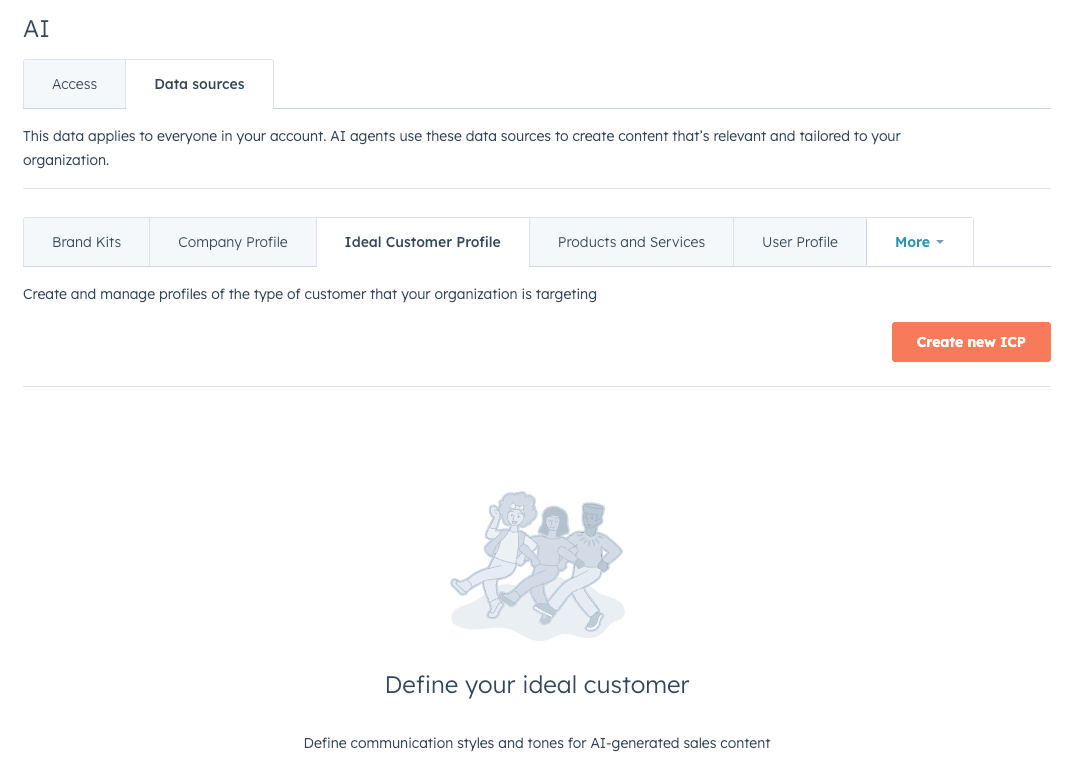
2. Enable AI data sources
Before you run the prospecting agent, ensure it has access to all the information it needs for research and personalization.
Head to Settings > Account Management > AI and enable the following toggles:
- Give users access to generative AI tools and features
- CRM data
- Customer conversation data
- Files data access

If any of these toggles are off, the agent will not be able to personalize emails properly and will spit out generic content that turns prospects off. So don’t run the prospecting agent without these enabled!
Then, click on the Data sources tab and make sure all the information set there is correct.
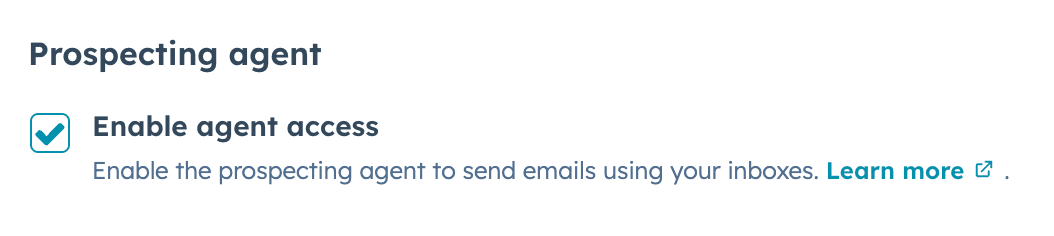
3. Connect your email sending account
The prospecting agent sends emails from your connected inbox on your behalf so that these emails look like they’re coming from you. If you have a connected inbox, you should already have this enabled.
If not, head to Settings > General > Email and click "Connect personal email." Follow the authentication flow to connect your inbox, and you’ll be set. Then scroll down to the Prospecting agent section and check the box to "Enable agent access.” Otherwise, the prospecting agent won’t be able to send emails for you.
4. Set up your exclusion lists
Lastly, it’s time to set up some guardrails for how the prospecting agent will behave and interact with contacts.
Once the selling profile is created, click on Agent setup in the top-right corner of the screen:
Then click on the Exclusion lists tab:
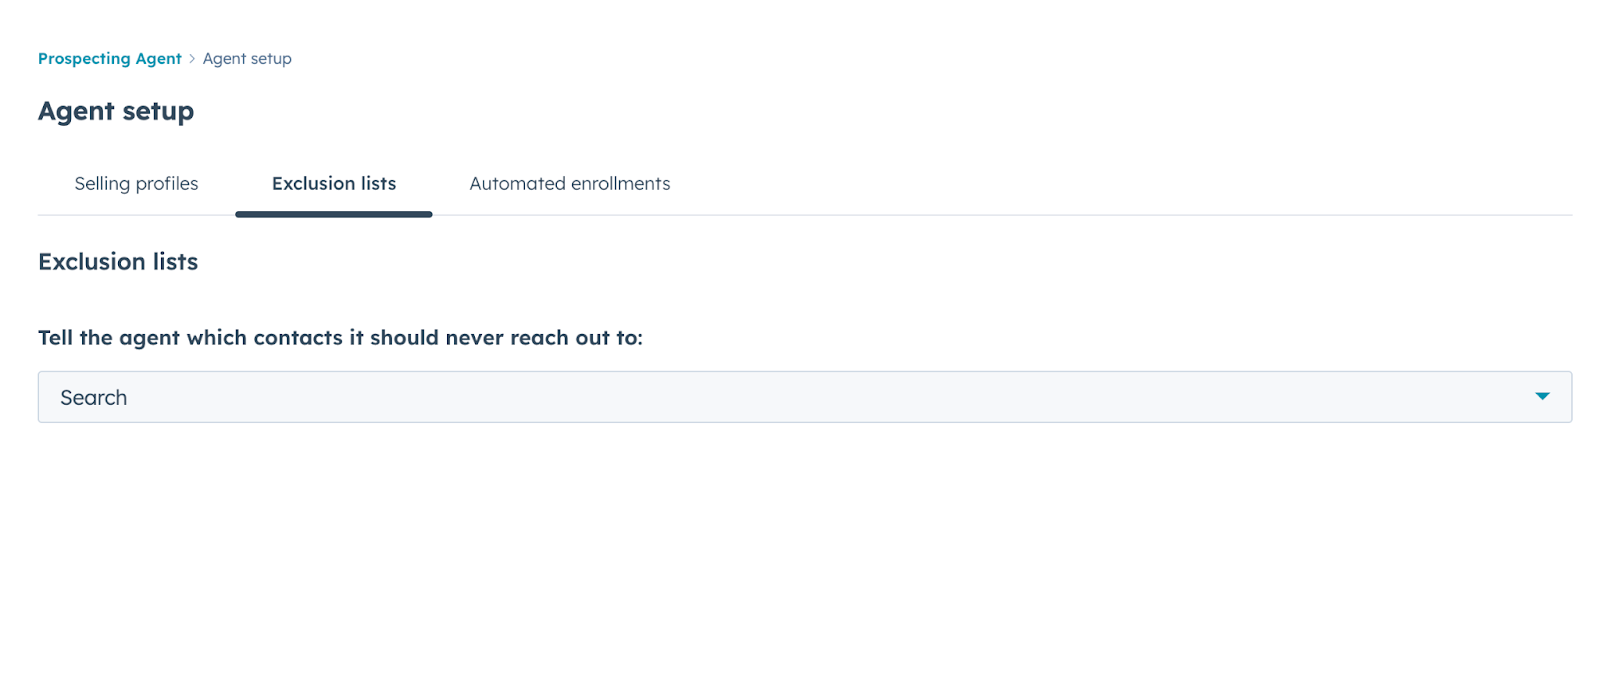
Upload lists of contacts who should never receive prospecting emails, like competitors, existing customers, partners, employees, and anyone who has opted out of email.
Now you’re set! Next, it’s time to enroll contacts and companies so you can prospect on autopilot.

Ready to fix your outbound process?
How to enroll contacts and companies into the HubSpot prospecting agent
Once you’re set up, it’s time to get to work… or let Breeze do the work for you. There are three ways you can enroll prospects into the prospecting agent for nurturing:
- Manually
- Automated based on rules
- Automated based on workflows
1. Manual enrollment
Manual enrollment lets you hand-select specific contacts or companies for the agent to prospect. This gives you the most control over who receives outreach and which selling profile they experience.
Follow these steps to enroll contacts manually:
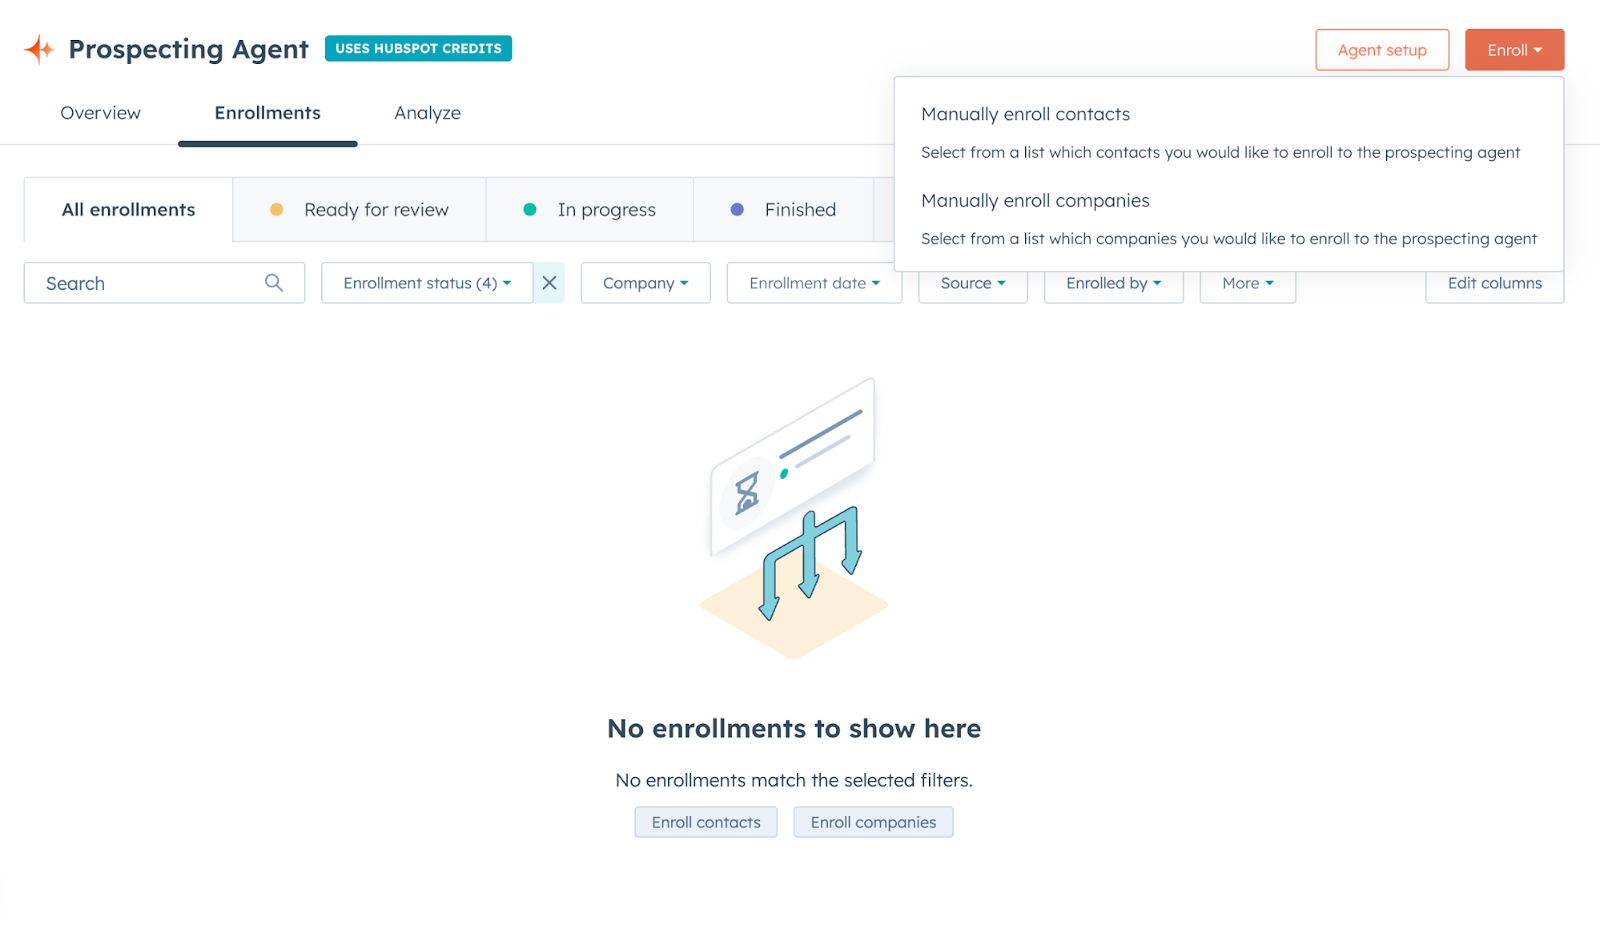
- Head to the prospecting agent page in HubSpot
- Click the "Enroll" dropdown in the top right
- Select "Manually enroll contacts" or "Manually enroll companies."
- Use search filters to find contacts matching your ideal customer profile (ICP).
- Check boxes next to the contacts you want to enroll
- Click "Next" and select which selling profile to use for this group
- Click "Enroll" to confirm
And you’re set!
2. Automated Enrollment Based on Rules
With automated enrollment, up to 10 contacts will be researched at once; the rest will stay in a “Queued” status. Here’s how to set it up:
- Head to the prospecting agent page in HubSpot
- Click the "Agent setup" and then the “Automated enrollments” tab
- Customize the rules available (for example, to enroll when a page is visited, select the page you want as a trigger)
- Select which selling profile applies to contacts meeting these rules
- Toggle the ruleset "On."
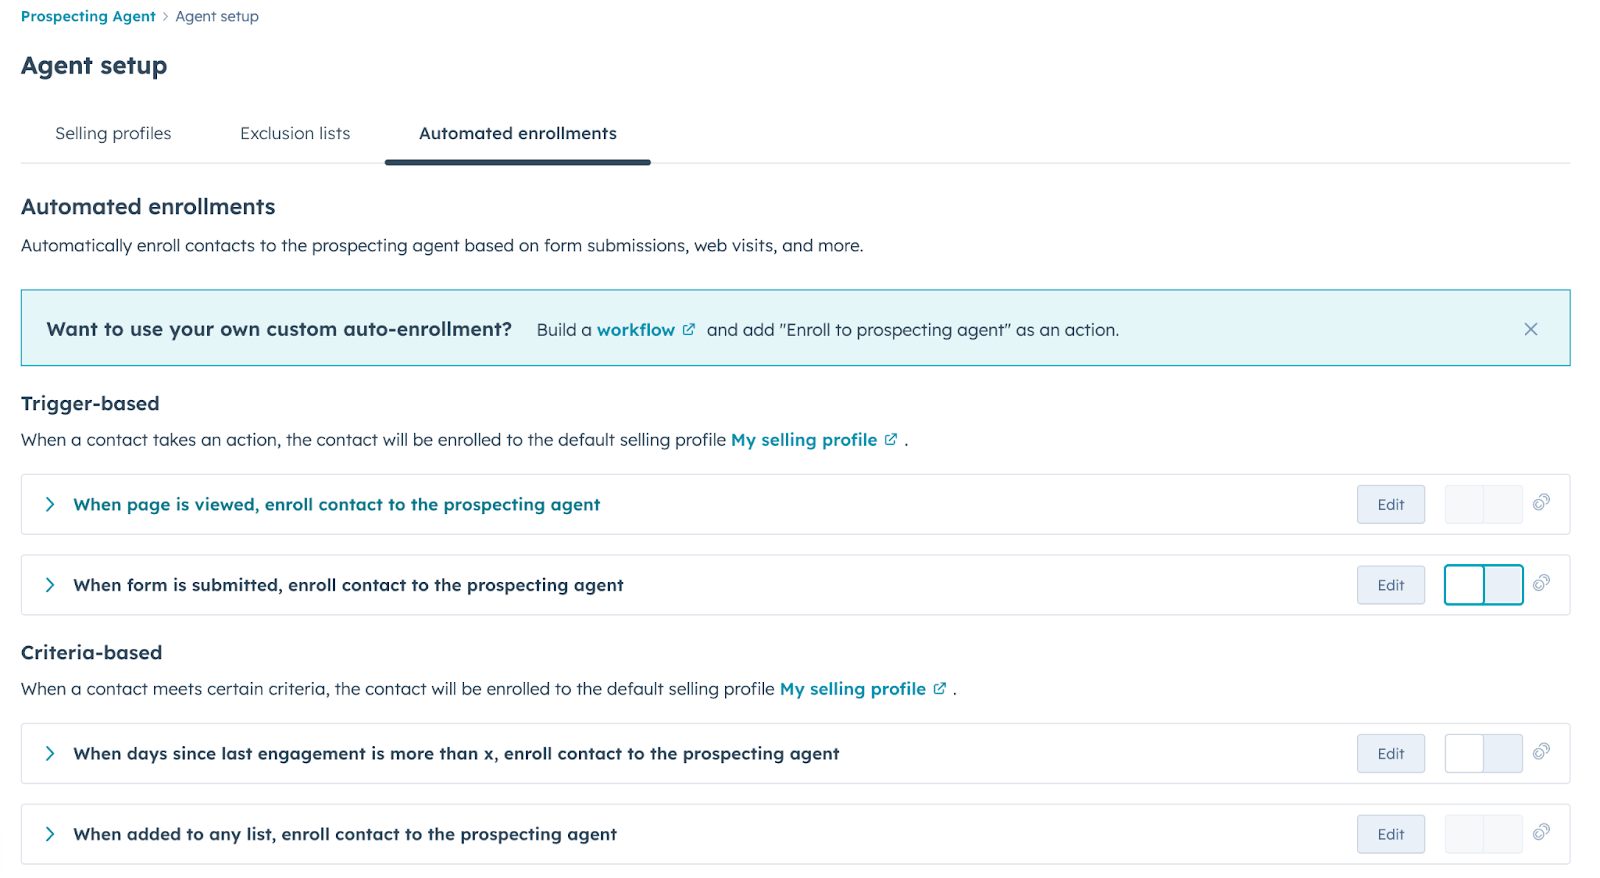
New contacts matching your criteria will automatically enroll on a rolling basis.
3. Workflow-Based Enrollment for Complex Criteria
You can also enroll contacts into the prospecting agent via a workflow for even more automation power!
Create a new workflow to enroll contacts or companies, and select the “Enroll in prospecting agent” action. This allows you to enroll contacts into prospecting with finely-tuned criteria like:
- Connecting with you on LinkedIn (you’ll need a Hublead account for this to sync LinkedIn activities back to HubSpot)
- Engaging with marketing or sales content on your website
- Re-engaging dormant leads
Once you add the action to enroll the prospecting agent, you will need to set the selling profile (that you created in step 1), the selling method, and whether to send messages automatically or wait for approval.
Tips for success with the HubSpot prospecting agent
While the HubSpot prospecting agent is incredibly useful, it’s not magic. You need to take care to set things up properly, otherwise you’ll risk burning through a prospect list and staring at an empty pipeline.
Take care to follow these best practices to improve your results:
- Start with good data: The prospecting agent can personalize emails, but it’s only as good as the data you give it. Before enrolling anyone, make sure you’ve granted the prospect agent access to your CRM and that your contacts have accurate, up-to-date information.
- Define your value proposition and ICP clearly: Vague selling profiles lead to vague outreach. Tell the agent exactly what you sell, who you sell it to, and what problems you solve in specific, outcome-focused language.
- Set brand voice tone guidelines: Without tone direction, the agent defaults to something that sounds like, well, an AI. Choose whether your outreach should read as conversational, technical, or formal, and match it to how your sales team actually talks to prospects.
- Set up custom instructions and guardrails: Give the agent specific rules, like "never mention pricing in the first email," "always reference the prospect's company by name," or "avoid jargon unless the contact's title is technical." Think of it as coaching a new SDR; the more specific your direction, the faster they ramp.
And above all, pay attention to your numbers. The prospecting agent can work wonders, but the only thing that matters is whether or not contacts respond to your outreach and book calls. Just because it’s AI-powered doesn’t mean it doesn’t need you to pay attention and optimize as you go.
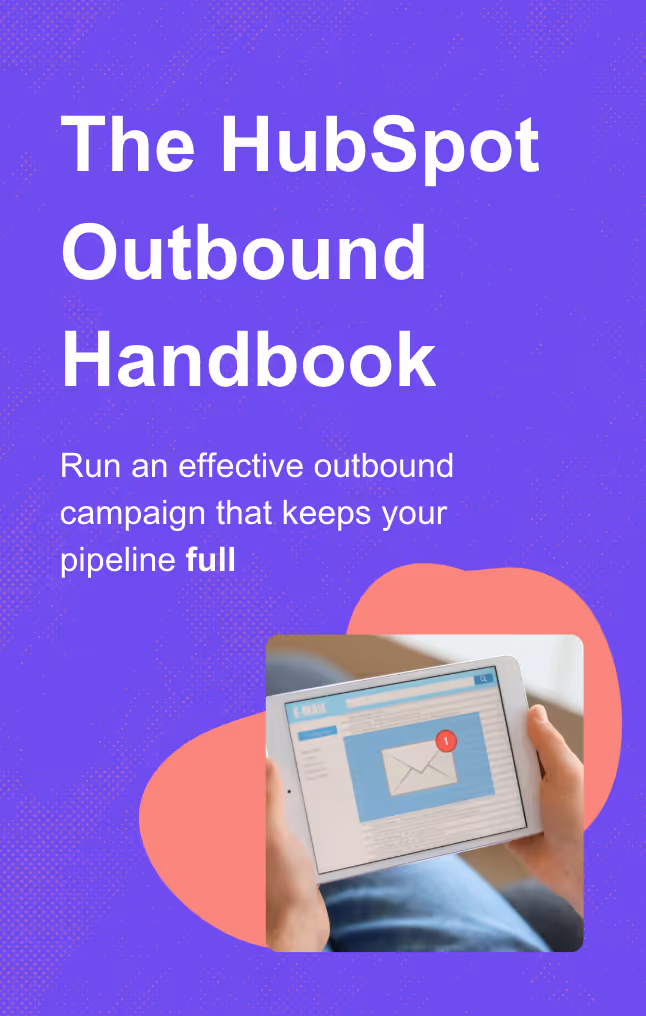
Ready to master outbound? Download the free HubSpot Outbound Handbook
The HubSpot prospecting agent is a godsend for busy sales reps, but remember that success in outbound is less about a single magical template, striking lightning in a bottle, or having the ultimate AI tool.
It’s more about orchestrating messages and touchpoints. Identify your top prospects, choose your channels, and coordinate your touchpoints to get their attention.
If you really want to level up your sales process in HubSpot, download the free HubSpot Outbound Handbook, our guide to building a scalable and effective outbound process in HubSpot. In this guide, we cover:
- The channels to use
- How to get the attention of your prospects
- The tools you should use to speed up sales
And more! Click the button below to get it for free and start scaling your outbound process in HubSpot.
Ready to fix your outbound process?
Frequently Asked Questions
Should you use the HubSpot prospecting agent instead of prospecting on your own?
Nope, but you can use it to make your prospecting more effective. You still need to put in effort to identify leads, set your strategy, reach out across channels, and monitor and adjust your outreach as needed. But HubSpot’s prospecting agent can speed things up by assisting with research and automating emails.
Which tiers get access to the HubSpot prospecting agent?
Sales Hub Professional and Enterprise get access to HubSpot’s prospecting agent. Note that using the prospecting agent will also require Breeze credits.
Can HubSpot’s prospecting agent prospect on LinkedIn?
No, HubSpot’s prospecting agent only works within HubSpot. You can use it to research companies and generate email messages, but it cannot work on outside channels like the phone or LinkedIn. With a tool like Hublead, though, you can sync all of your LinkedIn prospecting activities back to HubSpot to give the prospecting agent insights and collaborate across channels.

